How to Build a Local Voice Chatbot with p5.js and AI
In this tutorial, you will learn how to create a conversational voice chatbot directly within a p5.js sketch. We will cover integrating speech-to-text (STT) and text-to-speech (TTS) capabilities using open-source, locally runnable models, and discuss how to conceptualize a “brain” for your chatbot. This project aims to demystify AI technologies and encourage creative expression through code.
Prerequisites
- Basic understanding of JavaScript
- Familiarity with the p5.js library
- (Recommended) Knowledge of p5.js async/await features
- (Recommended) Familiarity with the Transformers.js library and Hugging Face models
Project Overview
The goal is to build a chatbot that can listen to your voice, convert it into text, process that text to generate a response, and then speak that response back to you. We will focus on using models that can run entirely within the browser on your local machine, ensuring privacy and accessibility. The core components are:
- Speech-to-Text (STT): Converting spoken audio into written text.
- Text-to-Speech (TTS): Converting written text into spoken audio.
- The “Brain”: A system to process the input text and generate an output response.
Step 1: Setting Up the p5.js Sketch and Interface
We’ll start by creating a basic p5.js sketch. For this project, we’ll implement a push-to-talk system, meaning the chatbot will only listen when you’re holding down the mouse button. This simplifies the audio capture process.
- Create a new p5.js sketch. You can use the p5.js web editor or set up a local HTML file.
- In the
setup()function, define the canvas size. A smaller canvas is fine, as the focus is on the code and functionality. - Implement
mousePressed()andmouseReleased()functions to control the push-to-talk mechanism. For visual feedback, you can change the canvas background color (e.g., red when pressed, green when released). - Declare global variables for audio recording and processing, such as
mic,recorder, andaudioChunks.
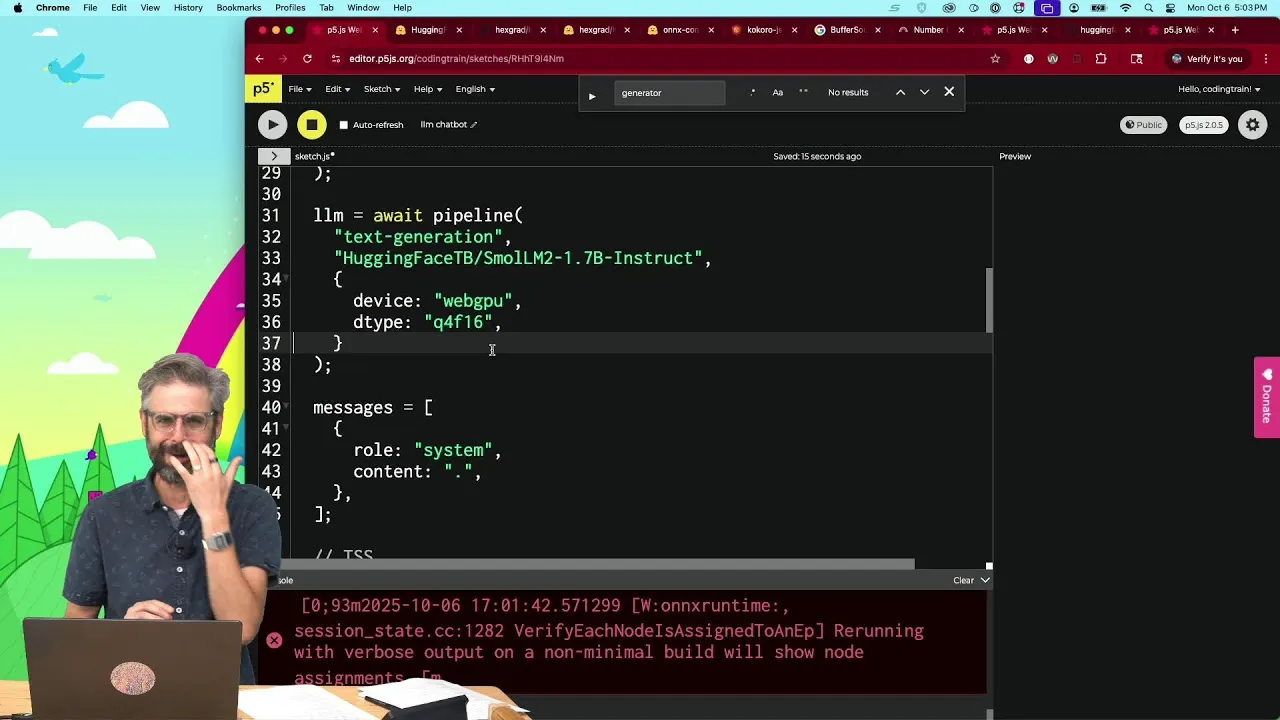
Step 2: Integrating Speech-to-Text with Transformers.js
We will use the Transformers.js library, which provides easy access to various machine learning models, including those for speech recognition. We’ll use OpenAI’s Whisper model, which can run locally.
- Install Transformers.js: Include the library in your sketch. You can do this via a script tag in your HTML file or using dynamic `import()` in your JavaScript. The tutorial suggests finding the correct path from the Transformers.js documentation.
- Import the Pipeline: Use the `pipeline` function from Transformers.js to load a model. This function acts as an interface to the machine learning models.
- Load the Whisper Model: Specify the task as ‘automatic-speech-recognition’ and choose a model. For English-only use and smaller footprint, ‘whisper-tiny’ is a good option. Ensure you select a model compatible with Transformers.js, often found in formats like ONNX. The model path will look something like
'Xenova/whisper-tiny.en'. - Specify the Device: For optimal performance in the browser, use
'webgpu'as the device to leverage the GPU. - Privacy Note: Emphasize that all audio processing happens locally on the user’s machine. Audio does not leave the browser.
Expert Note: Reading the model card for any machine learning model you use is crucial. It provides information on the model’s intended use, limitations, and training data.
The paper “Model Cards for Model Reporting” by Margaret Mitchell et al. Is a foundational resource for understanding transparent model reporting.
Step 3: Capturing Audio Input
To get audio from the microphone, we’ll use the Web Audio API, as it provides fine-grained control. While p5.sound library exists and is recommended for future development, using the native API helps understand the underlying mechanisms.
- Access Microphone: Use the `navigator.mediaDevices.getUserMedia()` API to request access to the user’s microphone. Set the constraint to `audio: true`.
- Create Media Recorder: Instantiate a `MediaRecorder` object, passing the microphone stream (`mic`) to its constructor.
- Handle Audio Data: Set up event listeners for the `MediaRecorder`. The most important is `ondataavailable`. This event fires when audio data is ready.
- Collect Audio Chunks: Inside the `ondataavailable` handler, push the incoming audio data (which comes as a Blob) into the
audioChunksarray. - Start/Stop Recording: In your
mousePressed()function, call `recorder.start()`. InmouseReleased(), call `recorder.stop()`.
Tip: The `recorder.stop()` method might not be instantaneous. For more robust handling, you might want to listen for the `onstop` event of the `MediaRecorder` to ensure all audio data has been processed before proceeding.
Step 4: Processing Audio Data for the Model
The audio data captured by the `MediaRecorder` needs to be converted into a format that the Whisper model can understand. This typically involves converting the audio chunks into an ArrayBuffer and then decoding it.
- Combine Audio Chunks: If multiple chunks are recorded, create a single `Blob` from the
audioChunksarray. - Create Audio Context: Instantiate an `AudioContext` object. This is necessary for decoding audio data.
- Set Sample Rate: Configure the `AudioContext`’s sample rate. The Whisper model often expects a specific rate, such as 16000 Hz (16 kHz).
- Decode Audio Data: Use the `audioContext.decodeAudioData()` method, passing the combined audio Blob (converted to an ArrayBuffer), to decode the audio into an `AudioBuffer` object. This is an asynchronous operation, so use `await`.
- Extract Waveform: From the decoded `AudioBuffer`, extract the channel data. For mono audio, this will be `decodedAudio.getChannelData(0)`. This array of numbers represents the audio waveform.
Warning: Ensure you correctly handle the asynchronous nature of `decodeAudioData` using `async/await`.
Step 5: Transcribing Speech to Text
With the audio waveform prepared, we can now pass it to the Whisper model loaded via Transformers.js to get the transcribed text.
- Call the Transcriber: Use the `transcriber` pipeline object (created in Step 2) and pass the waveform data to it. This is typically done using `await transcriber(waveform)`.
- Log the Result: Log the output of the transcription to the console to verify it’s working. The output will be a JavaScript object containing the transcribed text.
Tip: If you encounter errors like “transcriber is not defined,” ensure the `transcriber` variable is accessible in the scope where you are calling it (e.g., make it a global variable or pass it correctly).
Step 6: Implementing Text-to-Speech (Conceptual)
The transcript mentions that the TTS part was planned but not fully implemented in the provided segment. However, the process would involve loading a separate TTS model from Transformers.js and using it to convert the chatbot’s response text into audio.
- Load TTS Model: Similar to loading the STT model, use `pipeline(‘text-to-speech’, modelName)` to load a suitable TTS model (e.g., ‘Xenova/mms-tts’ or similar lightweight options).
- Generate Speech: Pass the text response from the chatbot’s “brain” to the TTS pipeline.
- Play Audio: Use the browser’s Web Audio API or the p5.sound library to play the generated audio output.
Step 7: Designing the Chatbot’s “Brain”
The “brain” is what determines how the chatbot responds to the transcribed text. The tutorial emphasizes creativity here, suggesting that complex AI isn’t always necessary.
Ideas for the “Brain”:
- Simple Rule-Based Systems: Use `if/else` statements or `switch` cases to respond to specific keywords or phrases.
- Markov Chains: Generate text based on probabilistic transitions between words or characters, trained on a corpus of text.
- Context-Free Grammars: Define grammatical structures to generate varied but coherent sentences.
- Pattern Matching: Implement basic string matching algorithms.
- External APIs: For more advanced responses, you could potentially call external NLP services, though this moves away from the local-first approach.
Example: A very basic brain could check if the transcribed text contains “hello” and respond with “Hi there!” using TTS. More complex systems like Eliza (mentioned in the transcript) used pattern matching and template-based responses.
Conclusion
By following these steps, you can build a functional, voice-enabled chatbot within your p5.js sketches. This project is a great starting point for exploring local AI models, creative coding, and the intersection of art and technology. Remember to experiment with different models and “brain” designs to unlock unique creative possibilities.
Source: Coding Challenge Session: Local Browser Conversational Chatbot (STT, TTS, and more?) (YouTube)