How to Integrate Advanced AI into Your Applications
This guide will show you how to use the Claude Agent SDK to add powerful AI capabilities directly into your own apps. You’ll learn how to set up and configure an agent, process its responses, and even connect it to remote development environments for complex tasks.
Understanding the Claude Agent SDK
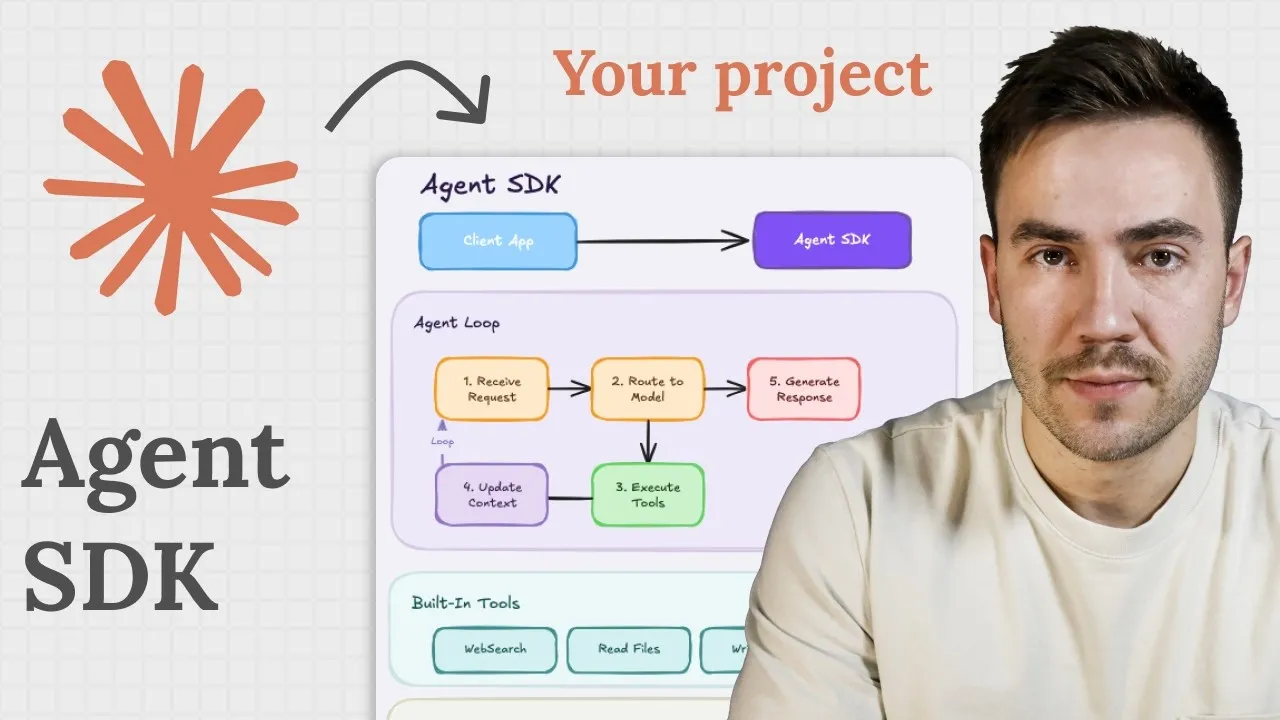
The Claude Agent SDK is more than just a way to talk to an AI model. It’s a full toolkit that lets you customize how an AI agent works within your applications. Unlike simpler SDKs that just give you access to an API, the Agent SDK provides a ready-to-use agent with built-in features like managing conversations and performing actions.
Agent SDK vs. Client SDK
It’s important to know the difference between the Claude Agent SDK and the Claude Client SDK. The Client SDK is like a basic remote control for the AI model. You send it a command, and it sends back a response. You have to build everything else, like remembering past conversations or letting the AI perform tasks, from scratch. The Agent SDK, on the other hand, gives you a complete AI assistant. It already knows how to manage conversations, can be easily given memory, and comes with built-in tools for tasks like reading files, searching the web, or running commands. You just need to tell it what tools to use and how much freedom it has.
Why the Agent SDK Was Created
The creators of Claude noticed that many people were using their AI for tasks beyond just writing code. They were using it for note-taking, creating videos, and working with data. To make this easier, they took the core technology behind Claude and released it as an SDK. This lets developers build directly on top of that powerful engine, creating more advanced and customized AI experiences.
Getting Started with Your First Agent
Let’s set up a basic agent. We’ll use the TypeScript version of the SDK for this example.
Install the SDK: First, you need to add the SDK to your project. Open your terminal and run the installation command for the TypeScript SDK.
Import the Query Function: In your code file, import the
queryfunction from the Claude Agent SDK. This function is the main way you’ll interact with and start your agent.Define Your Prompt: Tell the agent what you want it to do. For example, you can ask it to review images in a folder and create a report. Let’s say you have a folder with pictures of receipts; you could prompt it to review these images and report on the data within them.
Configure Agent Options: You need to provide settings that control how your agent behaves. This includes:
- Current Working Directory: Specify the folder the agent should work in. This could be a specific path on your computer, like a folder containing those receipt images.
- Model: Choose which Claude model the agent should use.
- API Key: Enter your Claude API key. You can get this from your Claude developer console.
- Allowed Tools: List the actions the agent is permitted to perform. The SDK comes with tools for reading/writing files, running web searches, executing bash commands, and more. For this example, you can allow all built-in tools to see what’s possible.
Handle the Response: The agent’s response comes in a stream of messages. You’ll use a loop to go through these messages as they arrive. These messages show what the agent is doing, its thought process, and the final results. You need to pull out the actual message content that you want to show to the user. The last message will typically have a type of ‘result’ and contains the final output.
Expert Tip: Look for messages with the type ‘assistant’ to get the agent’s direct replies, and check for the type ‘result’ for the final completion message.
Display the Results: Extract the text content from the relevant messages. This cleaned-up text is what you’ll show in your application’s user interface.
Building a More Complex Example: Processing Receipts
Let’s try a more practical example. Imagine you have a folder of receipt images, some of which might not be very clear. You want the AI to analyze them and create a summary.
Set Up Your Prompt: Instruct the agent to process the receipts in a specific folder. Ask it to review each image, extract the information, and create a markdown table. You can also tell it to save this table into a file named
receipts.md.Adjust Permissions (Use with Caution): For tasks that might normally require user confirmation, like writing files, you might need to adjust the agent’s permissions. You can set the
permission modetobypass permissionsanddangerously skip permissionstotrue. This allows the agent to complete tasks without stopping for approval.Warning: Bypassing permissions can be risky. Only do this for tasks you fully trust the agent to handle correctly, as it removes safety checks.
Run the Agent: Execute the code. You’ll see the agent’s progress in real-time, including messages about which files it’s reading and its reasoning. You can often inspect the exact commands it’s running.
Review the Output: Once finished, the agent should have created the
receipts.mdfile. Open it to see the markdown table containing the organized information from the receipts. This demonstrates the agent’s ability to perform actions like reading files, processing data, and writing new files with minimal setup.
Advanced Feature: Remote Agent Execution with Warp Oz
For tasks that require significant computing power or need to run even when your computer is off, you can use remote environments. The Warp Oz orchestration platform is designed for this.
What is Warp Oz?
Warp Oz allows you to run Claude coding agents in remote development environments. You can start a task, and the agent will work on it remotely. When it’s done, you get the results, like a code update ready for review as a pull request.
Integrating Warp Oz with Your App
You can trigger these remote agents using Warp’s tools, including a TypeScript SDK.
Install Warp Oz SDK: Add the Warp Oz agent SDK to your project.
Set Up the Client: Import the
OzAPIclass to create an instance that connects to the Warp Oz service.Key Methods: The SDK provides three main methods:
run(prompt, options): Starts a task in a remote environment with your given prompt and settings.list(): Shows you all your current and past agent runs, so you can check their status.retrieve(runId): Gets detailed information about a specific agent run.
Trigger a Remote Run: Use the
runmethod with a prompt. For example, ask the agent to create aREADMEfile for a project and generate a pull request when finished. You’ll need to provide anenvironment ID, which specifies where the agent should run.Create an Environment: If you don’t have an environment ID, you can create one on the Oz web platform (
oz.warp.dev). You’ll connect your GitHub account, choose a repository, and select a Docker image for the environment. Once created, copy the environment ID.Launch and Monitor: Paste the environment ID into your code and run the script. You can then monitor the agent’s progress in your UI or the Warp dashboard. When the task is complete, you’ll receive a pull request in your repository, with all the work done remotely.
Conclusion
The Claude Agent SDK, especially when combined with tools like Warp Oz, offers incredible power for building intelligent applications. You can create custom AI assistants that understand context, perform complex actions, and even operate in remote environments, all with relatively simple configuration. Experiment with these tools to see what innovative solutions you can build.
Source: You Can Build The Craziest Things with Claudes Agent SDK (YouTube)