How to Connect Elements Visually With CSS Anchors
Creating visual connections between elements on a webpage, such as the “threads” often seen in comment sections or hierarchical lists, can significantly improve user experience and readability. Traditionally, achieving this effect involved complex JavaScript solutions. However, with modern CSS, specifically CSS Anchors, this can be accomplished with remarkable ease and efficiency. This guide will walk you through the process of using CSS Anchors to create these visual links between elements.
What You Will Learn
In this tutorial, you will learn how to:
- Define anchor elements and their targets using CSS.
- Utilize pseudo-elements to create visual indicators like lines.
- Anchor pseudo-element properties (top, bottom, left, right) to specific points on anchor elements.
- Adjust positioning and sizing for precise visual connections.
- Scope anchor names to ensure correct element targeting in complex structures.
Prerequisites
- Basic understanding of HTML and CSS.
- Familiarity with CSS pseudo-elements (
::before,::after). - An understanding of CSS positioning (
relative,absolute).
Step-by-Step Guide
Step 1: Structure Your HTML
First, you need a clear HTML structure where you have a parent element (the “anchor”) and child elements (the “replies” or elements you want to connect to the anchor). For this example, we’ll use a comment structure.
The key is to give your main anchor element a unique identifier and your target elements a common class that will be used for anchoring.
<div class="comment">
  <h4>Main Comment</h4>
  <p>This is the main comment content.</p>

  <div class="reply">
    <p>Reply 1</p>
  </div>
  <div class="reply">
    <p>Reply 2</p>
  </div>
  <div class="reply">
    <p>Reply 3</p>
  </div>
</div>
Step 2: Define Anchor Elements in CSS
Next, in your CSS, you need to declare which elements will act as anchors and which elements will be the targets. This is done using the anchor-name property.
We’ll assign the name --comment to our main comment and --reply to each reply element. It’s crucial that the anchor name is unique for the element you want to reference from.
.comment {
  anchor-name: --comment;
  position: relative; /* Needed for absolute positioning of pseudo-elements */
}

.reply {
  anchor-name: --reply;
  position: relative; /* Needed for absolute positioning of pseudo-elements */
}
Step 3: Create the Visual Connector Using a Pseudo-element
We will use the ::after pseudo-element on each .reply element to draw the connecting lines. Initially, we’ll give it some basic styling and dimensions so we can see it while we position it.
Set the pseudo-element’s position to absolute. This allows us to position it relative to its parent (the .reply element).
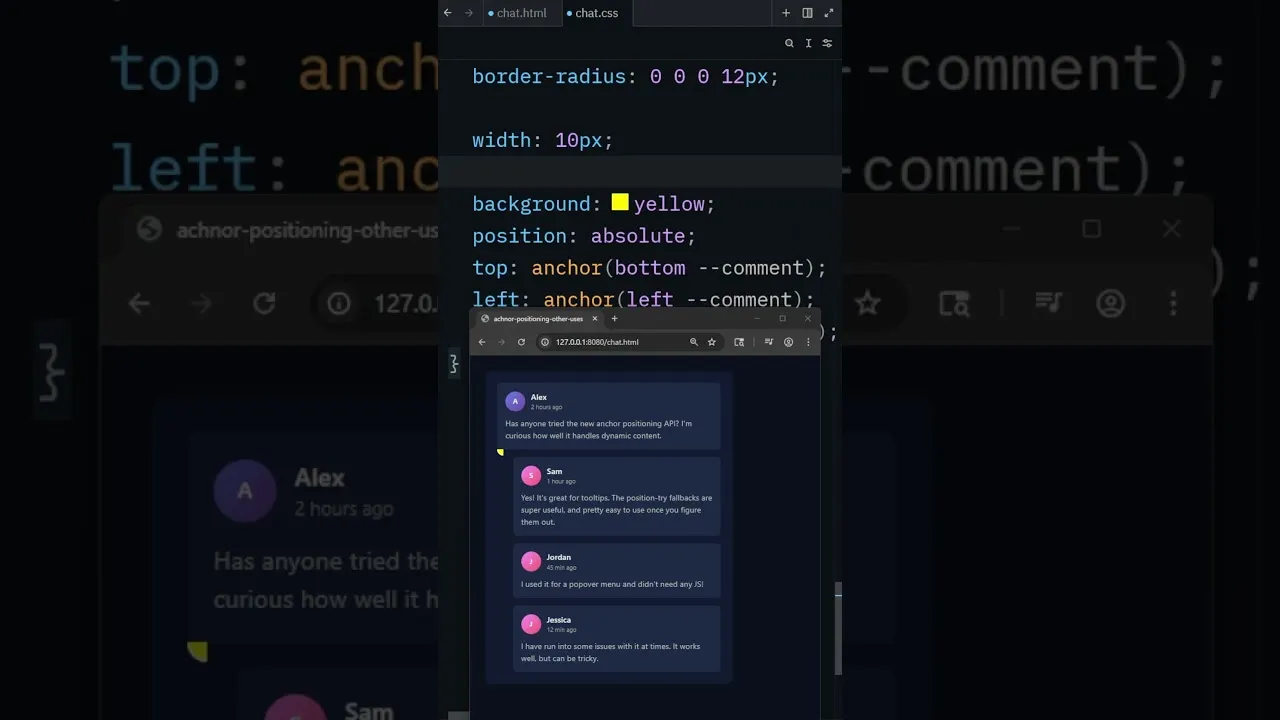
.reply::after {
  content: '';
  position: absolute;
  background-color: yellow; /* Temporary color to visualize */
  width: 10px;
  height: 10px;
}
Step 4: Anchor the Pseudo-element’s Position
Now, we’ll use the anchor() function to connect the pseudo-element’s position to the anchor elements. The syntax is anchor(NAME POSITION), where NAME is the anchor name and POSITION is the specific point on the anchor element (e.g., top, bottom, left, center).
Connecting to the Top of the Main Comment:
We want the connector to start from the top of the main comment. We’ll initially anchor the top of our pseudo-element to the top of the --comment anchor. Later, we’ll adjust this.
.reply::after {
  /* ... other styles ... */
  top: anchor(--comment top);
}
Expert Tip: If you’re having trouble seeing the element, temporarily give it a background color and dimensions as shown above. This helps in debugging the positioning.
Step 5: Adjusting the Vertical Anchor Point
Upon inspection, you might realize that anchoring to the top of the main comment isn’t quite right for creating a line that visually stems from the comment’s content. Often, you’ll want the line to originate from the bottom of the parent comment.
Adjust the top property of the pseudo-element to reference the bottom of the --comment anchor.
.reply::after {
  /* ... other styles ... */
  top: anchor(--comment bottom);
}
Step 6: Positioning the Connector Horizontally
Next, we need to position the connector horizontally. We’ll use the left property of the pseudo-element and anchor it to the left side of the --reply anchor.
To make the line stretch from the main comment down to the reply, we’ll anchor the bottom of the pseudo-element to the center of the --reply element. We’ll also remove the height we added for visualization.
.reply::after {
  /* ... other styles ... */
  bottom: anchor(--reply center);
  height: auto; /* Remove fixed height */
}
Warning: If the line appears to be stretching incorrectly, ensure the height property is not set or is set to auto when you intend for it to stretch.
Step 7: Refining the Horizontal Line
To create the horizontal line that connects the vertical thread to the reply, we’ll use the right property of the pseudo-element. We want this line to extend from the vertical thread towards the reply.
We anchor the right of the pseudo-element to the left of the --reply anchor. Then, we remove the width we used for visualization.
.reply::after {
  /* ... other styles ... */
  right: anchor(--reply left);
  width: auto; /* Remove fixed width */
}
Step 8: Adjusting Connector Thickness and Spacing
Now, let’s make the visual connector look like a line. We’ll remove the background color and add borders. We also need to adjust the positioning to ensure the line connects cleanly.
We’ll set the border-left and border-bottom to create the ‘L’ shape and then adjust the left positioning using calc() and a small offset (e.g., 1rem) to move it closer to the center of the reply element.
.reply::after {
  content: '';
  position: absolute;
  /* Anchoring properties from previous steps */
  top: anchor(--comment bottom);
  bottom: anchor(--reply center);
  right: anchor(--reply left);
  width: auto;
  height: auto;

  /* Styling for the line */
  border-left: 1px solid black;
  border-bottom: 1px solid black;
  background: none; /* Remove background */

  /* Adjusting position */
  left: calc(anchor(--reply left) + 1rem); /* Offset to align better */
}
Expert Tip: The calc() function is very useful here. You can use it to add or subtract values from anchor positions, allowing for fine-tuning of the connector’s placement. Adjust the 1rem value as needed for your design.
Step 9: Scoping Anchor Names for Multiple Targets
A common issue arises when multiple elements share the same anchor name. Without proper scoping, all pseudo-elements might incorrectly target the last element with that name. To fix this, we use anchor-scope.
By applying anchor-scope: --comment; to the .comment element, we ensure that any anchors defined within its descendants (like the ::after pseudo-element of a .reply) are scoped to that specific comment instance. This tells the browser to look for anchors only within the scope of the nearest ancestor with that anchor name.
.comment {
  anchor-name: --comment;
  position: relative;
  anchor-scope: --comment; /* Added for scoping */
}

.reply {
  anchor-name: --reply;
  position: relative;
}

.reply::after {
  /* ... all previous styles ... */
}
With anchor-scope applied, each .reply‘s pseudo-element will correctly reference its own parent .comment anchor, resulting in individual threads connecting to their respective comment.
Conclusion
Using CSS Anchors, you can create sophisticated visual connections between elements without relying on JavaScript. By defining anchor names, using pseudo-elements for drawing, and leveraging the anchor() function with careful positioning and scoping, you can achieve dynamic and responsive visual indicators that enhance your web designs.
Source: Tether to multple elements (YouTube)