Mastering New P5.js Text Rendering Features
This tutorial will guide you through three exciting new functions in the p5.js library: textWeight(), textContours(), and textModel(). You’ll learn how to control the thickness of your text, add outlines, and even explore text as a 3D model, opening up new creative possibilities for your visual projects.
Prerequisites
- Basic understanding of p5.js
- A working p5.js environment (web editor or local setup)
Understanding the New Text Functions
The latest updates to p5.js introduce powerful new ways to manipulate text, moving beyond simple rendering to offer more control over its appearance and form. These functions, textWeight(), textContours(), and textModel(), are designed to give artists and developers more expressive tools for their creative coding projects.
Step 1: Controlling Text Thickness with textWeight()
The textWeight() function allows you to control the boldness or thickness of the text rendered in your p5.js sketch. This is analogous to the strokeWeight() function but specifically for text characters.
How to Use textWeight()
- Set up your sketch: Begin with a basic p5.js sketch.
- Define text properties: Use the
textSize()andfill()functions as usual. - Apply
textWeight(): CalltextWeight()with a numerical value to set the desired thickness. A higher value will result in bolder text. - Render text: Use the
text()function to display your text.
Example:
function setup() {
  createCanvas(400, 200);
  textSize(32);
  fill(0); // Black text
}

function draw() {
  background(220);

  // Default text weight
  text('Normal Text', 50, 50);

  // Thicker text
  textWeight(3); // Set text thickness to 3
  text('Bold Text', 50, 100);

  // Reset text weight for subsequent elements if needed
  // textWeight(1);
}
Expert Tip:
textWeight() affects all subsequent text calls within the same drawing cycle unless reset. Be mindful of this when styling multiple text elements.
Step 2: Adding Outlines with textContours()
The textContours() function enables you to draw outlines around your text characters, similar to how stroke() works for shapes. This can add definition and style to your text.
How to Use textContours()
- Set up your sketch: Ensure you have a p5.js sketch running.
- Define text and outline styles: Use
fill()for the text color andstroke()andstrokeWeight()for the outline’s color and thickness. - Apply
textContours(): CalltextContours()to enable outlining for subsequent text. - Render text: Use the
text()function.
Example:
function setup() {
  createCanvas(400, 200);
  textSize(48);
  textFont('Arial'); // Specify a font that supports outlines well
}

function draw() {
  background(220);

  fill(255, 0, 0); // Red fill for text
  stroke(0, 0, 255); // Blue stroke for outline
  strokeWeight(2);

  textContours(true); // Enable text contours
  text('Outline', 50, 100);

  // To disable contours for future text elements:
  // textContours(false);
}
Expert Tip:
textContours() is a boolean function. Setting it to true enables outlines, while false disables them. Remember to manage this setting if you need different text styles within the same sketch.
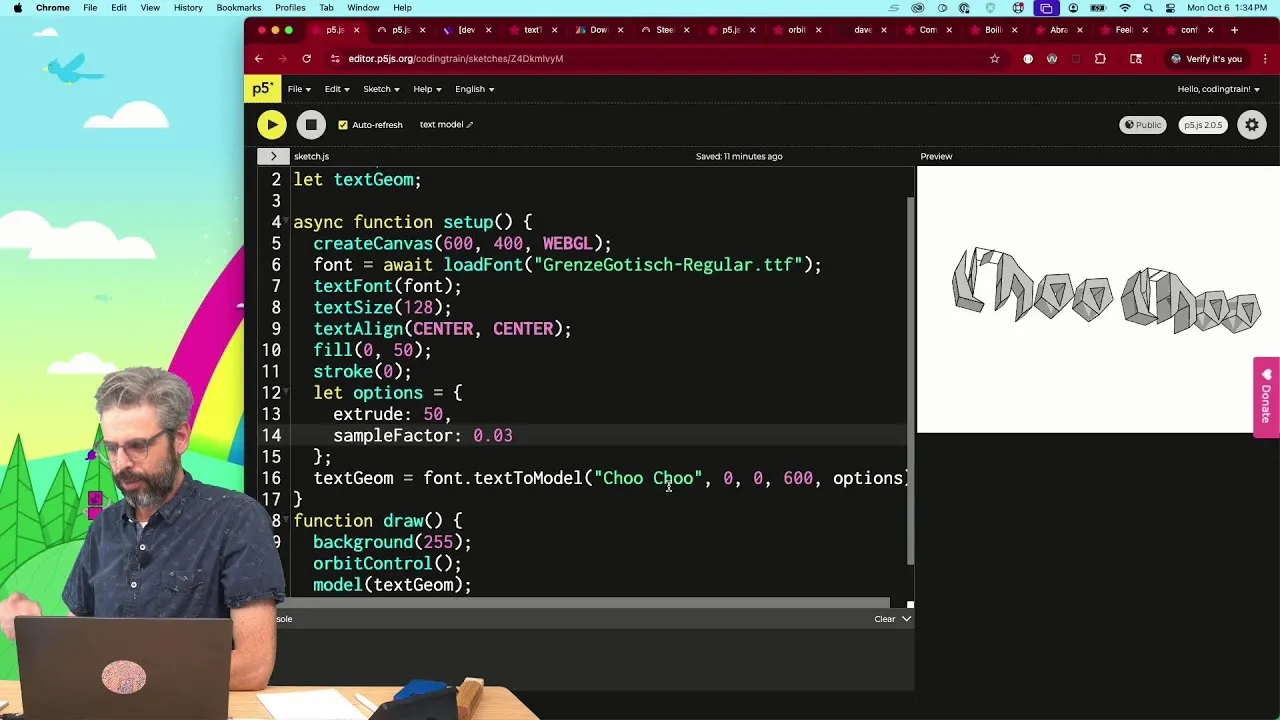
Step 3: Exploring Text as 3D Models with textModel()
This advanced function, textModel(), allows you to extrude text into a 3D form, treating each character as a mesh that can be manipulated in three-dimensional space. This opens up possibilities for 3D typography and generative art.
How to Use textModel()
- Enable 3D rendering: Create your canvas using
createCanvas(width, height, WEBGL). TheWEBGLrenderer is necessary for 3D operations. - Set up text and 3D parameters: Use
textSize(),fill(), and potentiallystroke(). - Apply
textModel(): CalltextModel()with parameters for extrusion depth. - Render text: Use the
text()function. The text will now be rendered as a 3D object.
Example:
function setup() {
  createCanvas(600, 400, WEBGL); // Use WEBGL for 3D rendering
  textSize(72);
  textFont('Arial');
}

function draw() {
  background(100);

  // Orbit control for better viewing (requires p5.js addons or custom implementation)
  // orbitControl();

  fill(255);
  noStroke();

  // Render text as a 3D model with extrusion depth
  textModel(true, 50); // Enable text model with an extrusion depth of 50 units

  // Rotate the text for a better 3D effect
  rotateX(frameCount * 0.01);
  rotateY(frameCount * 0.01);

  text('3D Text', 0, 0, 0); // Center the text in 3D space

  // To disable text as a 3D model:
  // textModel(false);
}
Important Notes for textModel():
textModel()requires theWEBGLrenderer.- The extrusion depth parameter determines how far the text is extruded.
- Manipulating 3D text often involves 3D transformations like
rotateX(),rotateY(),translate(), and camera controls. - You might need to experiment with different fonts, as some fonts are better suited for 3D extrusion than others.
Conclusion
By incorporating textWeight(), textContours(), and textModel() into your p5.js projects, you can significantly enhance the visual appeal and complexity of your text elements. Experiment with these functions to push the boundaries of your creative coding and bring your ideas to life with dynamic typography.
Source: new p5.js 2 functions: textWeight, textContours, textModel (YouTube)