How to Manufacture a Disc Golf Disc: A Step-by-Step Guide
Disc golf combines the thrill of outdoor recreation with the fascinating principles of physics and aerodynamics. But have you ever wondered how these discs are made? This guide takes you behind the scenes at MVP Disc Sports to explore the intricate manufacturing process, from raw materials to the finished product. You’ll learn about injection molding, robotics, plant design, and the unique ‘overmold’ technology that sets MVP discs apart.
Prerequisites
- No prior knowledge of disc golf manufacturing is required.
The Manufacturing Process
The creation of a disc golf disc involves several key stages, utilizing advanced technology and meticulous attention to detail. MVP Disc Sports, a leader in the industry, employs a sophisticated process to produce both solid and ‘overmold’ discs.
Step 1: Material Preparation
The process begins with the raw plastic materials, typically sourced from American manufacturers. These materials arrive as clear plastic granules. Before they can be used, they must be meticulously dried.
- Receive Raw Materials: Plastic granules are received from suppliers.
- Moisture Removal: Plastics, especially polyurethanes, are hygroscopic, meaning they absorb moisture from the air. This moisture must be removed through a drying system to ensure optimal injection molding. The granules are fed into a drying hopper where hot air circulates, often in a closed-loop system, to remove excess moisture.
- Material Handling Automation: MVP utilizes automated systems for material handling. Vacuum lines transport the granules from storage containers (like Gaylords) to the drying system and then to the injection molding machines. This system is designed with a central manifold, allowing for easy switching between different plastic types (e.g., soft vs. firm) and ensuring the right material is delivered to the correct machine.
- Drying Time Control: The duration of the drying process is crucial. The system is designed with level sensors that act as a ‘demand’ indicator. As a machine consumes plastic, the level drops, triggering the system to supply more material and maintaining the optimal drying time based on the material’s exposure to hot air.
Expert Note: Proper drying is critical. Insufficiently dried plastic can lead to defects in the final product, affecting its performance and durability.
Step 2: Injection Molding
Injection molding is the core process where the plastic is melted and formed into the disc shape. MVP uses a reciprocating screw injection molding machine.
- Melting the Plastic: Plastic granules are fed into the injection molding machine. Inside, a reciprocating screw rotates and moves forward, using a combination of friction, shear, and external barrel heat to melt the plastic into a molten state. The screw’s design, with increasing diameter along its length, compresses and heats the plastic efficiently.
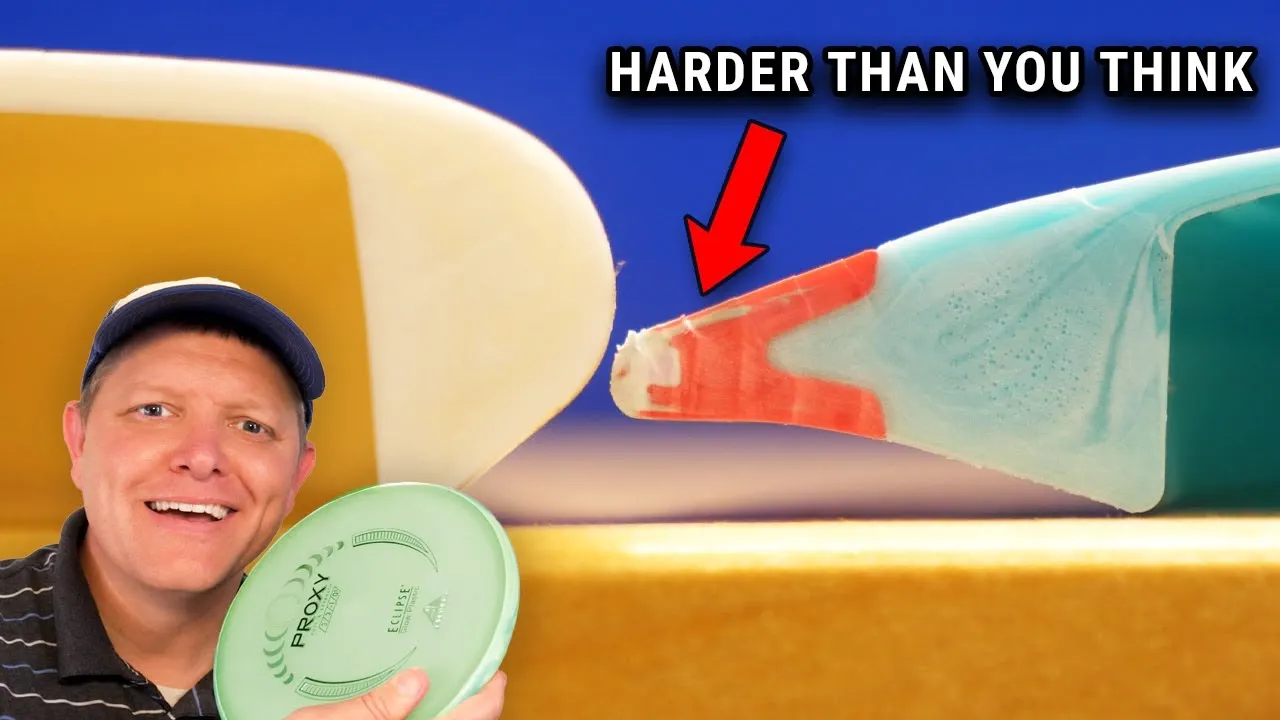
- Injection into the Mold: The molten plastic is then injected under high pressure into a precisely engineered mold. The mold consists of two halves, forming the cavity of the disc. For overmold discs, this process is used to create the inner ‘core’ or ‘flight plate’ first.
- Mold Cooling: The mold is actively cooled using chilled water circulating through internal circuits. This rapid cooling allows the plastic to solidify quickly, setting the shape of the disc. Turbulent flow is maintained for efficient heat exchange.
- Demolding: Once the plastic has cooled sufficiently (dwell time), the mold opens, and ejector pins push the newly formed disc out of the cavity. A robotic arm, often a collaborative robot (cobot), is typically used to precisely pick up the hot disc.
Tip: The ‘overmold’ discs at MVP are created by first molding the inner core and then using a separate injection molding process to add the outer rim, which can be made of a different plastic material for specific properties like grip or durability.
Step 3: Overmolding Process (for Overmold Discs)
This is a signature process for MVP Disc Sports, where a second plastic is molded around the core.
- Robot Cell Automation: Cores are automatically fed through a robotic cell. Robots equipped with specialized end effectors (suction cups, often with a knocking mechanism to ensure separation) pick up the cores.
- Indexing and Positioning: The robot precisely positions the core within a secondary mold designed for the overmold. This positioning is critical for ensuring the correct placement of the outer rim.
- Overmold Injection: Molten plastic for the outer rim is injected into the mold around the pre-formed core.
- Trimming and Finishing: After the overmold solidifies, the disc moves to a flash trimmer. This machine uses a ceramic blade to precisely cut away any excess plastic (flash) from the overmolding process, including the sprue and runner material. A groove is often incorporated into the mold design to facilitate this trimming.
Expert Note: The design of the robotic cells and the end effectors is crucial for efficiency and accuracy. MVP has developed proprietary solutions, including jigs that index the disc to ensure consistent positioning for both the trimming and subsequent processes.
Step 4: Quality Control and Customization
Throughout the manufacturing process, quality control measures are in place, and customization is applied.
- Weight Marking: Discs are moved to a station where a laser precisely burns the weight in grams onto the disc. This involves a scale communicating with the laser controller to ensure accurate marking.
- Color Blending: For multi-colored discs or swirled effects, specialized color feeders are used. These feeders precisely meter different colored plastic pellets into the injection molding process. Programming these feeders allows for intricate color patterns, often following color wheel principles to ensure complementary colors are placed next to each other without undesirable mixing.
- Part Detection: Proximity sensors and other detection systems are used extensively to ensure robots and machinery know the location of parts, crucial for automation.
- Recycling: Waste plastic material from the trimming process is collected and reground. This recycled material is used to create MVP’s ‘R2’ (recycled) line of discs, demonstrating a commitment to sustainability.
Tip: The ability to precisely control color mixing allows for an almost infinite variety of visual designs on MVP discs, making each one unique and appealing to players.
Step 5: Art Application
Once the physical disc is manufactured, the final aesthetic touches are applied.
- Foil Stamping: For single-color graphics, a heat-activated foil stamping process is used. A heated plate presses the foil onto the disc, transferring the design. This process requires careful temperature control to prevent burning the plastic and ensure a clean transfer.
- Proprietary Multi-Color Printing: MVP has developed proprietary machines capable of applying multiple colors of foil graphics simultaneously, allowing for complex and varied designs. This technology enables a vast range of aesthetic possibilities for their discs.
Warning: The foil stamping process involves high heat, and precautions must be taken to avoid burns.
Step 6: Packaging and Shipping
The final stage involves preparing the discs for distribution.
- Inspection: Discs undergo final inspection to ensure they meet quality standards.
- Boxing: Completed discs are packaged into boxes.
- Wrapping: Boxes are often wrapped using automated pallet wrapping machines for secure transport.
- Warehousing: The finished products are stored in a large warehouse, awaiting shipment to retailers worldwide. MVP continually optimizes its warehouse space and systems for efficient inventory management.
The entire process, from raw plastic granules to a finished, art-adorned disc golf disc, showcases a blend of advanced engineering, automation, and a passion for the sport.
Source: How Disc Golf Discs Are Made (MVP Manufacturing Tour) – Smarter Every Day 301 (YouTube)