Master CSS Custom Functions for Dynamic Styling
CSS custom functions are a powerful new feature that allows you to create reusable blocks of code, making your stylesheets more dynamic and easier to manage. This guide will walk you through the fundamentals of creating and using these functions, from basic transparency effects to advanced responsive design patterns.
What You’ll Learn
- How to define and name CSS custom functions.
- Understanding function parameters and default values.
- The role of the `result` property and CSS cascade in functions.
- Implementing functions with media queries for dynamic styling.
- Adding type information to function parameters and return values.
- Creating responsive sizing functions.
Prerequisites
- Basic understanding of CSS syntax and properties.
- Familiarity with CSS variables (custom properties).
- (Optional) Knowledge of CSS relative color syntax and CSS layers.
Step 1: Defining Your First CSS Function
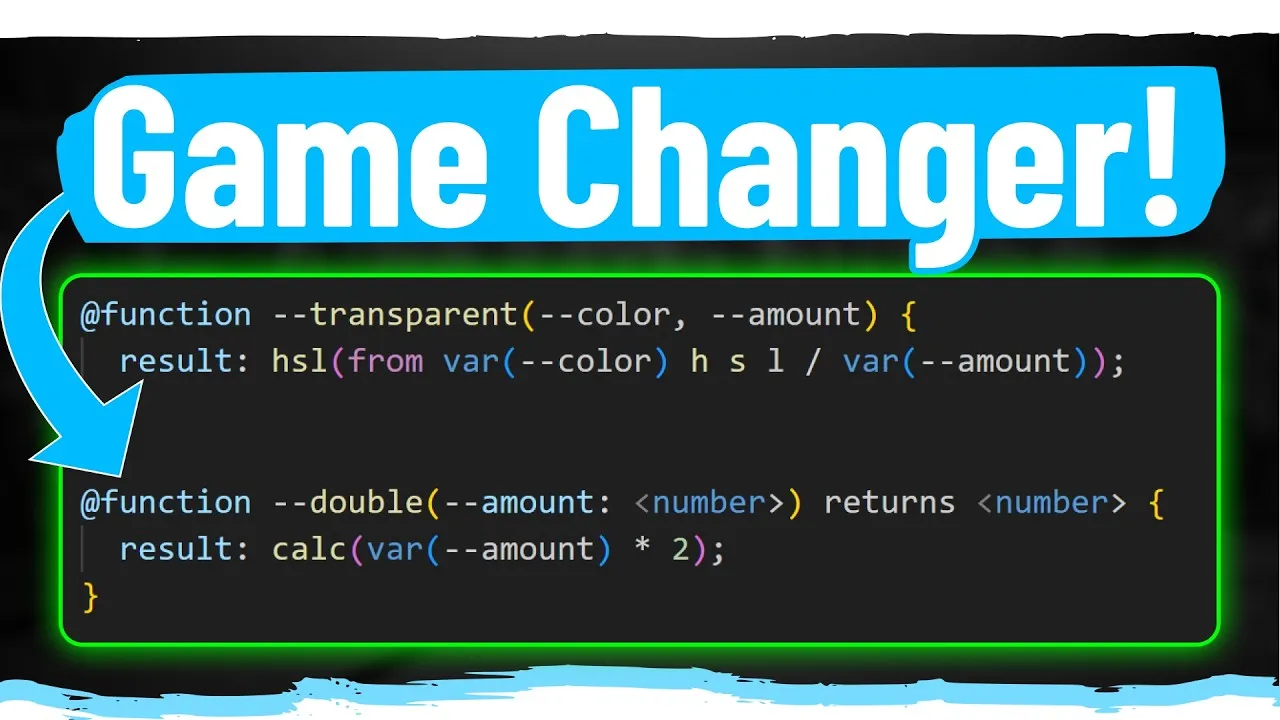
To create a custom function in CSS, you use the `@function` keyword. Function names must start with two dashes (`–`). Let’s create a function called `–transparent` that adjusts the opacity of a given color.
- Start with the `@function` keyword.
- Name your function using the double-dash syntax: `–transparent`.
- Define parameters within parentheses. Our function will take a `color` and an `amount`. Both parameter names must also start with double dashes: `(–color, –amount)`.
- Inside the function, use the `result` property to define what the function returns. This is different from JavaScript’s `return` keyword; `result` acts like any other CSS property, and the last defined value wins in the cascade.
- To set the transparency, we can leverage CSS relative color syntax, specifically the HSL color space. Use `var(–color)` to reference the input color.
- Modify the HSL values. For this example, we’ll keep hue, saturation, and lightness the same and use the `amount` parameter to set the alpha channel (transparency). The syntax might look like `hsl(from var(–color) H S L / var(–amount))`.
Example Code:
@function --transparent (--color, --amount) {
  result: hsl(from var(--color) H S L / var(--amount));
}
Step 2: Calling Your CSS Function
Once defined, you call your function like a variable, prefixing its name with the double dashes, and passing the required arguments.
- Use the function name with double dashes: `–transparent`.
- Pass the arguments in the order they were defined: first the color, then the amount. For example, `var(–transparent(red, 0.5))` will make the color red 50% transparent.
Example Usage:
.my-element {
  background-color: var(--transparent(red, 0.5));
}
Tip: Ensure there are no commas between the function name and its arguments, and no commas between the arguments themselves if they are passed directly. The correct syntax is `var(–function-name(arg1 arg2))`. If you are passing CSS variables, you might use `var(–function-name(var(–color-var) var(–amount-var)))`.
Step 3: Setting Default Values
You can provide default values for your function parameters. If an argument is not provided when calling the function, the default value will be used.
- After a parameter name, add a space and then the default value.
Example with Default Values:
@function --transparent (--color: blue, --amount: 0.5) {
  result: hsl(from var(--color) H S L / var(--amount));
}
Now, if you call `var(–transparent())`, it will use blue with 50% transparency. If you call `var(–transparent(green))`, it will use green with the default 50% transparency.
Step 4: Understanding the `result` Property and Cascade
Unlike JavaScript functions that stop execution after returning a value, CSS functions are part of the cascade. The `result` property is crucial because the last value assigned to `result` within the function’s scope is the one that will be applied. This allows functions to be influenced by media queries and other cascading rules.
- Consider this example: if you define `result: orange;` after the HSL calculation, the element’s background will become orange, overriding the transparent color, because `orange` is the last value assigned to `result`.
- This behavior is key for dynamic styling. You can use media queries within a function to change the `result` based on screen size, browser support, or other conditions.
Example with Media Query:
@function --transparent (--color: blue, --amount: 0.5) {
  result: hsl(from var(--color) H S L / var(--amount));

  @media (width < 200px) {
    result: orange;
  }
}

.my-element {
  background-color: var(--transparent(red, 0.2)); /* Will be transparent red, but orange on screens smaller than 200px */
}
Expert Note: This means you need to think about the cascade differently. The final `result` is determined by the order of definition and specificity, just like any other CSS property.
Step 5: Function Overloads and CSS Layers
CSS functions can be defined multiple times, similar to function overloading in JavaScript, especially when using CSS layers. The last defined function (according to cascade and specificity rules) will take precedence.
- If you define the same function name in different CSS layers (e.g., `base` and `theme`), the function in the later layer will override the one in the earlier layer.
- This allows for variations of a function to be applied based on context, such as different themes or base styles.
Example with Layers:
@layer base {
  @function --transparent (--color, --amount) {
    result: hsl(from var(--color) H S L / var(--amount));
  }
}

@layer theme {
  @function --transparent (--color, --amount) {
    result: hsla(from var(--color) H S L / var(--amount)); /* Using hsla for direct alpha */
  }
}

.my-element {
  /* This will use the function from the 'theme' layer */
  background-color: var(--transparent(blue, 0.7));
}
Note: While this feature exists, for most use cases, you’ll likely define your functions once.
Step 6: Adding Type Information
To improve code clarity and enable future developer tool support (like warnings and errors), you can specify types for your function parameters and return values.
- After a parameter name, add a space, then angle brackets (“) containing the type. For example: `–color: color`.
- For parameters that can accept multiple types (e.g., a number or a percentage), use the `type()` function with a pipe (`|`) separator: `type(number | percentage)`.
- Specify the return type using the `returns` keyword followed by the type: `returns color`.
Example with Type Hinting:
@function --transparent (
  --color: color,
  --amount: type(number | percentage),
) returns color {
  result: hsl(from var(--color) H S L / var(--amount));
}

.my-element {
  /* Currently, dev tools might not enforce these types, but it's good practice for future compatibility. */
  background-color: var(--transparent(purple, 75%));
}
Warning: As this feature is new, browser developer tools may not yet provide warnings or errors based on these type definitions. However, defining types is crucial for maintainability and future enhancements.
Step 7: Creating Responsive Size Functions
Custom functions are excellent for creating responsive behaviors. Let’s build a function that takes small, medium, and large values and applies them based on screen width.
- Define a function, e.g., `–responsive`, that accepts parameters for small, medium, and large values: `(–small-size, –medium-size, –large-size)`.
- Set a default `result`. A good starting point is the largest value.
- Use media queries to override the `result` for smaller screen sizes.
- Define conditions: e.g., if width is less than 200px, use `–small-size`; if width is between 200px and 300px, use `–medium-size`.
- Handle cases where a value might not be provided (e.g., no large size specified) using CSS’s `if()` function for fallbacks.
Example Responsive Function:
@function --responsive (
  --small-size,
  --medium-size,
  --large-size: var(--medium-size) /* Default large to medium if not provided */
) {
  result: var(--large-size);

  @media (width  200px and width <= 300px) {
    result: var(--medium-size);
  }
}

.my-element {
  /* Example usage: */
  /* On small screens: blue, medium: orange, large: green */
  background-color: var(--responsive(blue, orange, green));
}

.another-element {
  /* Example with only small and medium provided, large defaults to medium */
  color: var(--responsive(yellow, pink)); /* Will be yellow on small, pink on medium and large */
}
Tip: The `if()` function in CSS is powerful for creating conditional logic within your styles, including within custom functions. You can chain `if()` statements or use `calc()` for more complex calculations.
Conclusion
CSS custom functions open up a new realm of possibilities for creating dynamic, reusable, and maintainable stylesheets. By understanding how they interact with the cascade and leveraging features like default values, type hinting, and responsive logic, you can build more sophisticated and efficient web interfaces.
Source: I Love the NEW CSS Functions (YouTube)